Text Tutorial
Text是一个允许用户输入文本的控件,org.eclipse.swt.widgets.Text提供了不同风格的Text。如单行的,多行的,只读的,输入密码的,搜索框等。
我们先通过一段代码来做个初步的认识:
Display display = new Display();
Shell shell = new Shell(display);
shell.setText("Text Tutorial");
shell.setSize(300, 200);
shell.setLayout(new RowLayout(SWT.VERTICAL));
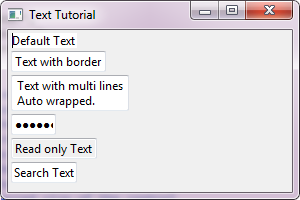
Text text1 = new Text(shell, SWT.NONE);
text1.setText("Default Text");
Text text2 = new Text(shell, SWT.BORDER);
text2.setText("Text with border");
Text text3 = new Text(shell, SWT.MULTI |SWT.BORDER);
text3.setText("Text with multi lines\nAuto wrapped.");
Text text4 = new Text(shell, SWT.PASSWORD |SWT.BORDER);
text4.setText("123456");
Text text5 = new Text(shell, SWT.READ_ONLY | SWT.BORDER);
text5.setText("Read only Text");
Text text6 = new Text(shell, SWT.SEARCH | SWT.BORDER);
text6.setText("Search Text");
shell.open();
while (!shell.isDisposed()) {
if (!display.readAndDispatch()) {
display.sleep();
}
}
display.dispose();
运行后的效果图:
需要注意的问题:
单行(SWT.SINGLE)和多行(SWT.MULTI)只能设置一个。自动换行(SWT.WRAP)只能应用在多行(SWT.MULTI)的Text中,如果不设置SWT.WRAP,多行的Text只有在文本中遇到换行符(\n)的情况下才换行。可以给多行(SWT.MULTI)的Text设置水平(SWT.HORIZONTAL)的或垂直的(SWT.VERTICAL)滚动条。文本对齐(Alignment)可以通过SWT.LEFT,SWT.RIGHT和SWT.CENTER来设置。对于搜索框(SWT.SEARCH)可以用SWT.ICON_CANCEL或SWT.ICON_SEARCH来设置图标,但是这要根据系统来定,如Windows就没有此功能。比如,在MAC下带取消图标的搜索框就长这个样子 `当你点击取消图标时,会清空搜索框里面的内容。
对于搜索框(SWT.SEARCH),可以用setMessage()方法来设置提示信息。只读的Text,不允许被修改内容,且背景色为灰色。默认情况下,Text是没有边界的,要用SWT.BORDER来显示边界。
事件监听:
1. DefaultSelection:通过addSelectionListener(SelectionListener)或addListener(SWT.DefaultSelection, Linstener)添加。
触发条件:
* 单行(SWT.SINGLE)文本框,当键盘的回车键(Enter)按下时触发。
* 搜索框(SWT.SEARCH),当键盘的回车键(Enter)按下时触发。当搜索框显示取消图标(SWT.ICON_CANCEL)时,点击取消图标清空文本也会触发,不过在Event的detail信息中会包含SWT.ICON_CANCEL值;同理,如果搜索框中显示搜索图标(SWT.ICON_SEARCH)时,点击搜索图标也会触发,且在Event的detail信息中会包含SWT.ICON_SEARCH值。
看一个具体的例子:
Display display = new Display();
Shell shell = new Shell(display);
shell.setText("Text Tutorial");
shell.setSize(300, 200);
shell.setLayout(new GridLayout());
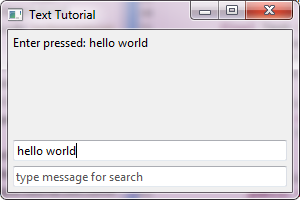
final Label label = new Label(shell, SWT.NONE);
label.setLayoutData(new GridData(GridData.FILL_BOTH
| GridData.GRAB_HORIZONTAL | GridData.GRAB_VERTICAL));
final Text text1 = new Text(shell, SWT.BORDER);
text1.setLayoutData(new GridData(GridData.FILL_HORIZONTAL
| GridData.GRAB_HORIZONTAL));
text1.addSelectionListener(new SelectionListener() {
@Override
public void widgetSelected(SelectionEvent e) {
// Never called for text.
}
@Override
public void widgetDefaultSelected(SelectionEvent e) {
label.setText("Enter pressed: " + text1.getText());
}
});
final Text text2 = new Text(shell, SWT.SEARCH | SWT.ICON_SEARCH);
text2.setLayoutData(new GridData(GridData.FILL_HORIZONTAL
| GridData.GRAB_HORIZONTAL));
text2.setMessage("type message for search");
text2.addListener(SWT.DefaultSelection, new Listener() {
@Override
public void handleEvent(Event event) {
label.setText("Enter pressed to perform search : "
+ text2.getText());
}
});
shell.open();
while (!shell.isDisposed()) {
if (!display.readAndDispatch()) {
display.sleep();
}
}
display.dispose();
如图:
2. Modify:通过addModifyListener(ModifyListener)或addListener(SWT.Modify, Listener)添加。
触发条件:当文本框中的内容发生变化时立即触发。
    final Text text = new Text(shell, SWT.BORDER);
    text.addModifyListener(new ModifyListener() {

        @Override
        public void modifyText(ModifyEvent e) {
            String newTextValue = text.getText();
            // Put your code here
        }
    });
3. Verify:通过addVerifyListener(VerifyListener)或addListener(SWT.Verify, Listener)添加。
触发条件:当文本框的内容发生变化时立即触发,跟Modify类似,但是它的优先级比Modify高,也就是说如果Verify没有通过,文本框的内容就不会更改,Modify事件也就不会被触发了。这个监听一般用在我们需要输入一些特殊的字符(比如全是数字或全是字母等等)的情况下。
对于VerifyEvent,我们需要知道一下几点信心:
-
VerifyEvent.start:文本改变的起始位置。 -
VerifyEvent.end:文本改变的结束位置。 -
VerifyEvent.text:输入的新的文本。 -
VerifyEvent.doit:设置为false,则表明Verify没有通过。
通过一段示例来加深印象:
    Display display = new Display();
    Shell shell = new Shell(display);

    shell.setText("Text Modify Tutorial");
    shell.setSize(300, 200);

    shell.setLayout(new GridLayout());

    final Text result = new Text(shell, SWT.MULTI | SWT.V_SCROLL);
    result.setLayoutData(new GridData(GridData.FILL_BOTH
            | GridData.GRAB_HORIZONTAL | GridData.GRAB_VERTICAL));

    final Text text = new Text(shell, SWT.BORDER);
    text.setLayoutData(new GridData(GridData.FILL_HORIZONTAL
            | GridData.GRAB_HORIZONTAL));
    text.addModifyListener(new ModifyListener() {

        @Override
        public void modifyText(ModifyEvent e) {
            result.setText(result.getText() + "\nText modified to: "
                    + text.getText());
        }
    });

    text.addVerifyListener(new VerifyListener() {

        @Override
        public void verifyText(VerifyEvent e) {
            int start = e.start;
            int end = e.end;
            String newValue = e.text;
            result.setText("Replace [" + start +"-" + end + "] to '" + newValue + "'");
             // Character 'd' is not allowed.
            if ("d".endsWith(newValue)){
                e.doit = false;
            }
        }
    });

    shell.open();

    while (!shell.isDisposed()) {
        if (!display.readAndDispatch()) {
            display.sleep();
        }
    }
    display.dispose();
更多示例: * verify input (only allow digits) * verify input in a template (YYYY/MM/DD) * verify input using a regular expression
参考资料:
* Text snippets
* 如果想了解更多的关于设置颜色,字体等其它属性的相关内容,请移步至控件的通用设置
* 如果想了解更多的关于Layout和LayoutData的相关内容,请移步至布局管理器
* SWT Example: ControlExample
* Sample code and further information
Back to Home 上一篇:Button Tutorial 下一篇:Combo Tutorial