Button Tutorial
org.eclipse.swt.widgets.Button类能创建五种类型的按钮,他们分别是:
* 按钮(Button):SWT.PUSH
* 复选框(CheckBox):SWT.CHECK
* 单选框(RadioBox):SWT.RADIO
* 复选按钮(Toggle):SWT.TOGGLE
* 箭头(Arrow):SWT.ARROW
先来一段代码看看它们:
    Display display = new Display();
    Shell shell = new Shell(display);

    shell.setText("Button Tutorial");
    shell.setSize(300, 200);

    shell.setLayout(new GridLayout(2, true));

    //Button
    new Button(shell, SWT.PUSH).setText("Button1");
    new Button(shell, SWT.PUSH).setText("Button2");

    //CheckBox
    new Button(shell, SWT.CHECK).setText("CheckBox1");
    Button checkBox = new Button(shell, SWT.CHECK);
    checkBox.setText("CheckBox2");
    checkBox.setSelection(true);

    //RadioBox
    new Button(shell, SWT.RADIO).setText("RadioBox1");
    Button radioBox = new Button(shell, SWT.RADIO);
    radioBox.setText("RadioBox2");
    radioBox.setSelection(true);

    //Toggle
    new Button(shell, SWT.TOGGLE).setText("Toggle1");
    Button toggle = new Button(shell, SWT.TOGGLE);
    toggle.setText("Toggle2");
    toggle.setSelection(true);

    //Arrow
    new Button(shell, SWT.ARROW|SWT.LEFT);
    new Button(shell, SWT.ARROW|SWT.RIGHT);
    new Button(shell, SWT.ARROW|SWT.TOP);
    new Button(shell, SWT.ARROW|SWT.BOTTOM);
    shell.open();

    while (!shell.isDisposed()) {
        if (!display.readAndDispatch()) {
            display.sleep();
        }
    }
    display.dispose();
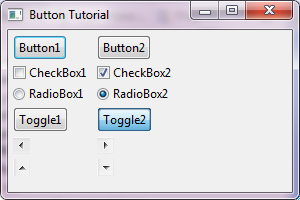
运行之后的效果如下:

需要注意的问题:
Wrap(SWT.WRAP)属性,此属性对Arrow(SWT.ARROW)无效。它是用来对Button的长文本进行自动换行的,详细可参考上一篇Label Tutorial对Arrow(SWT.ARROW)来说,可以通过SWT.LEFT,SWT.RIGHT,SWT.TOP和SWT.BOTTOM来设置箭头的方向。对于除Arrow(SWT.ARROW)的按钮来说,可以通过SWT.LEFT,SWT.RIGHT和SWT.CENTER来设置图片和文本的对齐位置。对于CheckBox(SWT.CHECK),RadioBox(SWT.RADIO)和Toggle(SWT.TOOGLE)三个按钮来说,我们可以通过setSelection(true|false)来设置他们的选择状态和通过getSelection()来读取他们的选择状态。
事件监听
选择事件(Selection):
 final Label label = new Label(shell, SWT.WRAP);
 label.setLayoutData(new GridData(GridData.FILL_BOTH
         | GridData.GRAB_HORIZONTAL | GridData.GRAB_VERTICAL));
 // Button
 final Button button = new Button(shell, SWT.PUSH);
 button.setText("Button");
 button.addSelectionListener(new SelectionListener() {

     @Override
     public void widgetSelected(SelectionEvent e) {
         label.setText(label.getText() + "\n"+"Button Pressed: " );
     }

     @Override
     public void widgetDefaultSelected(SelectionEvent e) {
     }
 });
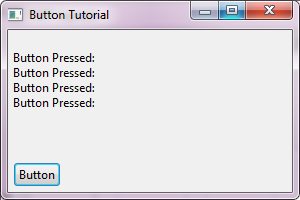
效果如下:

参考资料:
* Button snippets
* 如果想了解更多的关于设置颜色,字体等其它属性的相关内容,请移步至控件的通用设置
* 如果想了解更多的关于Layout和LayoutData的相关内容,请移步至布局管理器
* SWT Example: ControlExample
* Sample code and further information
Back to Home 上一篇:Label Tutorial 下一篇:Text Tutorial